White Labeling with Truv Templates
Templates let you customize every borrower-facing touchpoint: branding, notifications, the verification widget, returned documents, and fallback behavior. Templates can be scoped to specific business units or branches. What you can customize:Company branding
Company branding
- Logo, accent color, button colors, and background
- Custom text and messaging throughout the flow
- Privacy policy link
Notifications
Notifications
- Email and SMS content for initial invite, reminder, and completion messages
- Notification recipients (see Status Update Recipients below)
- Link expiration window (default: 72 hours)
Truv Bridge experience
Truv Bridge experience
- Employer search configuration and pre-populated employer lists
- Success screen messaging
- Fallback to document upload when payroll connection is unavailable
Documents returned
Documents returned
- Default: 6 most recent paystubs, 3 most recent W-2s, 3 YTD paystubs
- Configurable per product type within the template
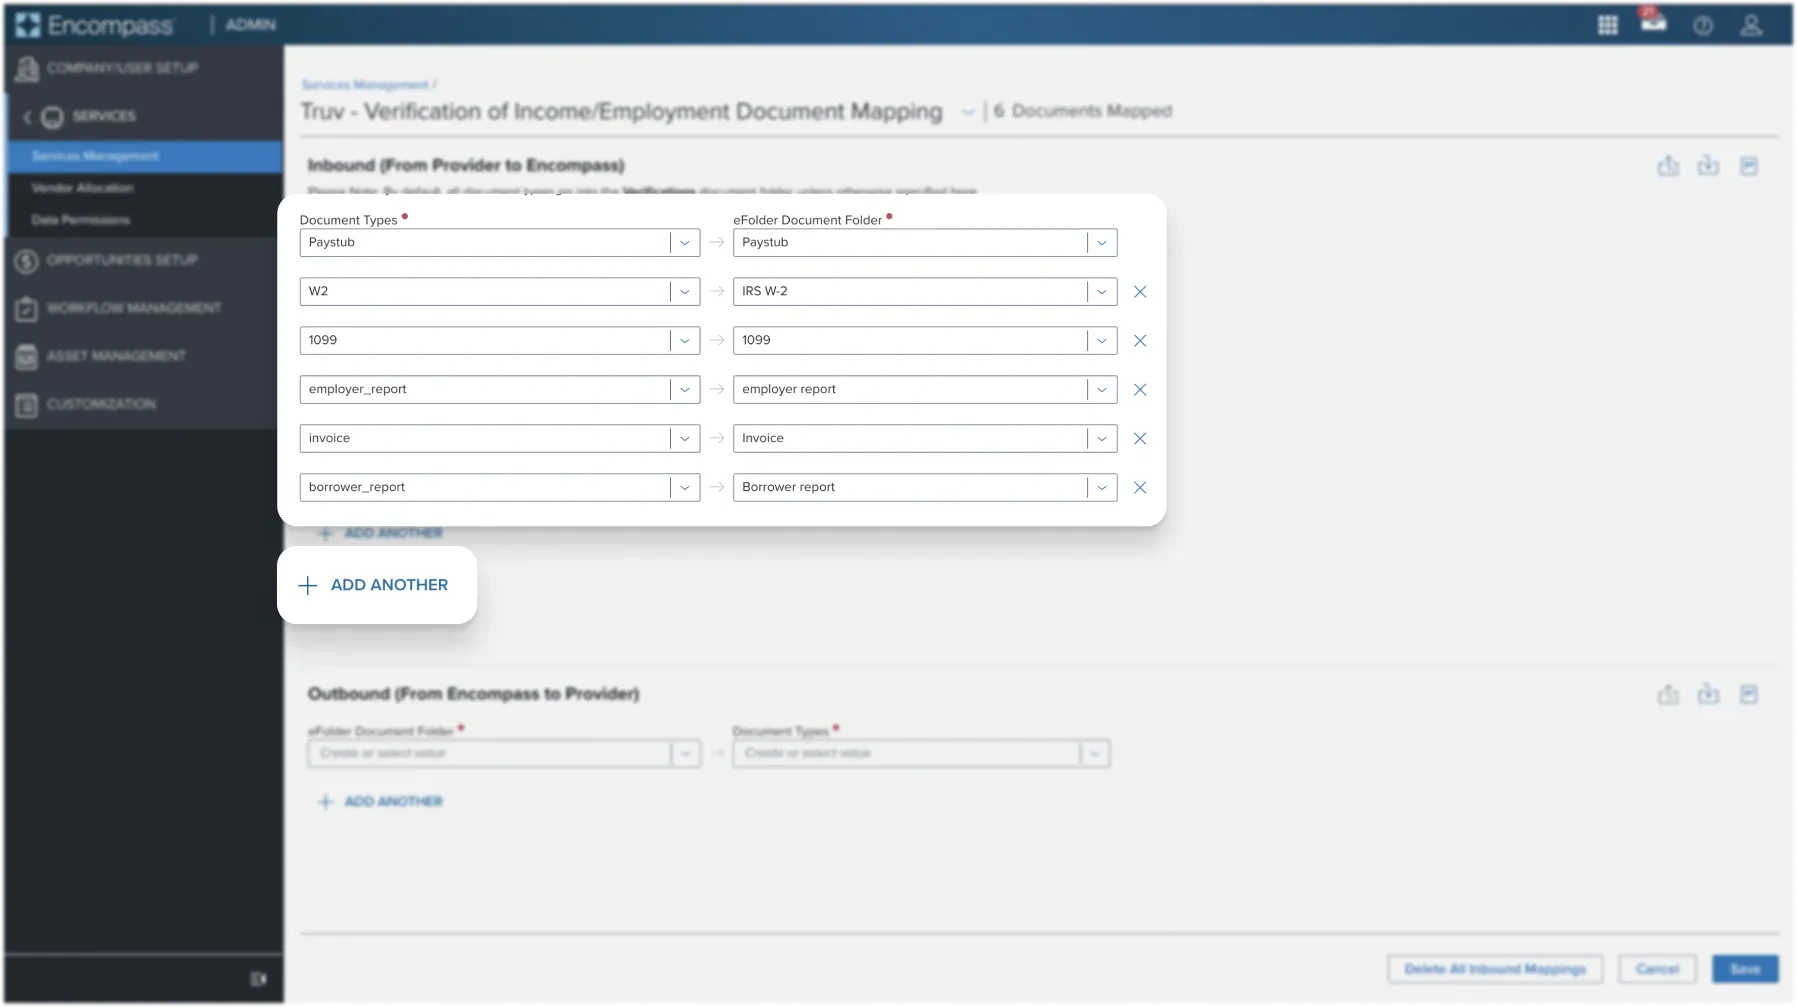
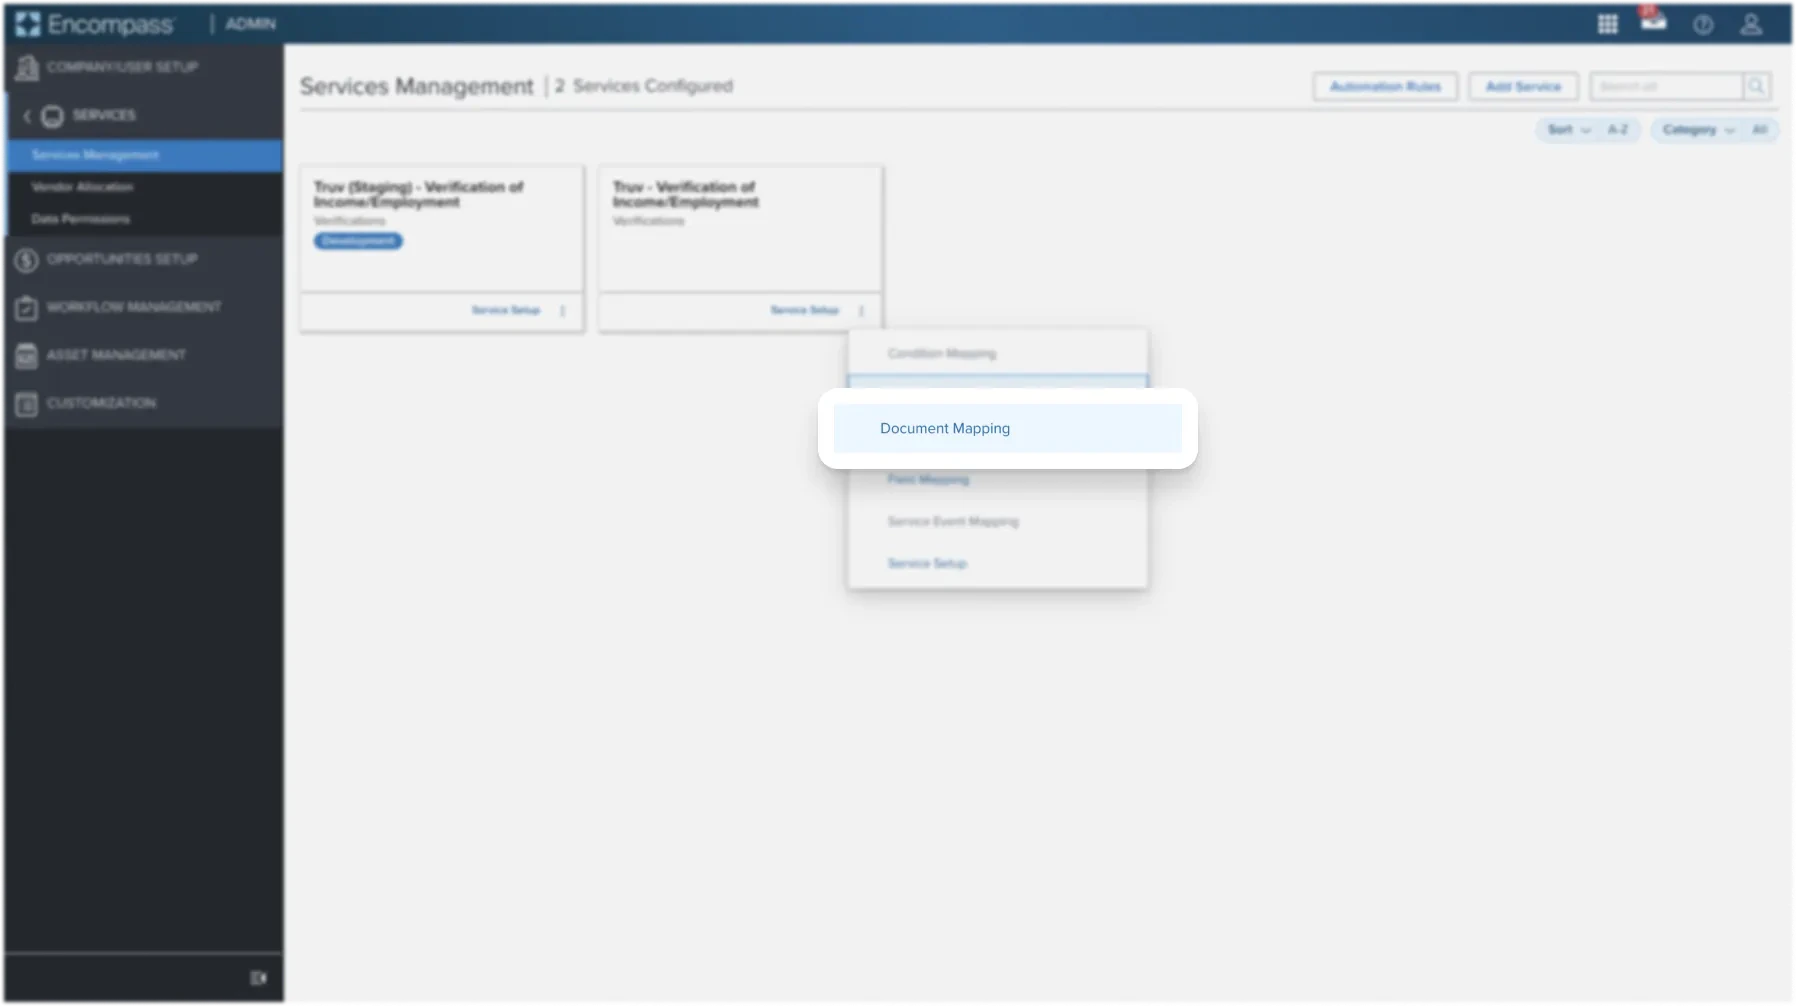
eFolder Document Mapping
Control exactly where each Truv document is routed in the Encompass eFolder.Access document mapping in Encompass
Log into Encompass Web as an administrator. Navigate to Admin > Services > Services Management. Find the Truv service tile and click the three dots to select Document Mapping.
| Document Type | Description |
|---|---|
paystub | Pay stubs retrieved from the borrower’s payroll account |
w2 | W-2 documents retrieved from the payroll account |
1099 | 1099 tax statements |
employer_report | Employment and income summary for a specific employer |
borrower_report | Comprehensive employment/income summary including the Report ID |
invoice | Service cost itemization |
voa_report | Asset, balance, and transaction data including the Report ID |
Document Type names must match the table exactly. eFolder destination names are customizable to match your Encompass folder structure.
Status update recipients
Configure which team members receive status notifications at each step of the verification process. Four routing options:| Option | Description |
|---|---|
| Loan originator and loan processor on the loan | Truv reads the loan originator and processor names associated with every loan application to ensure the right loan personnel gets notified of the updates. |
| Order creator | Truv recognizes that every organization functions differently and notifications are completely customizable based on your needs. Truv provides you with the optionality to send status updates to the personnel creating the order. |
| Static distribution list | Truv provides you with additional customization and the optionality to send status updates to a static distribution list. Clients have the opportunity to update and maintain this in their Account settings in Truv Dashboard. |
| Custom role | Truv allows lenders to automatically send status updates to any user or role in the loan file automatically. See our full setup guide below. |
Mapping a custom role email field
You can map any Encompass field containing an email address to automatically populate the Status updates field:Configure field mapping in Encompass
Log into Encompass Web as an administrator. Navigate to Admin > Services. Find Truv - Verification of Income/Employment/Assets and click the three dots at the bottom right to select Field Mapping.Add the following mapping:
- Encompass Field ID: any standard, custom, or LR field that contains an email address
- Mapping Type: Maps To
- Provider Field Name:
truv_custom_email_field
Wholesale and Correspondent Lender Support
Wholesale and correspondent lenders can map an Encompass field (such as the loan officer’s name) to a custom field in Truv’s template, enabling personalized borrower-facing notifications.Map the Encompass field to Truv's custom field
Log into Encompass Web as an administrator. Navigate to Admin > Services. Find Truv - Verification of Income/Employment and click the three dots to select Field Mapping.Add the following mapping:
- Encompass Field ID:
1612(Loan Originator Name) or any other Encompass field - Mapping Type: Maps To
- Provider Field Name:
custom_field
Add the custom field placeholder to your template
Open the Truv Dashboard and navigate to Customization > Templates. Open the relevant template and add the
{custom_field} placeholder to notification content, including:- Email First
- Email Reminder
- SMS First
- SMS Reminder
- Landing Page variations
- Manual orders: Select the configured template before creating the order
- ASO orders: Copy the Template ID from the Truv Dashboard and paste it into the ASO configuration
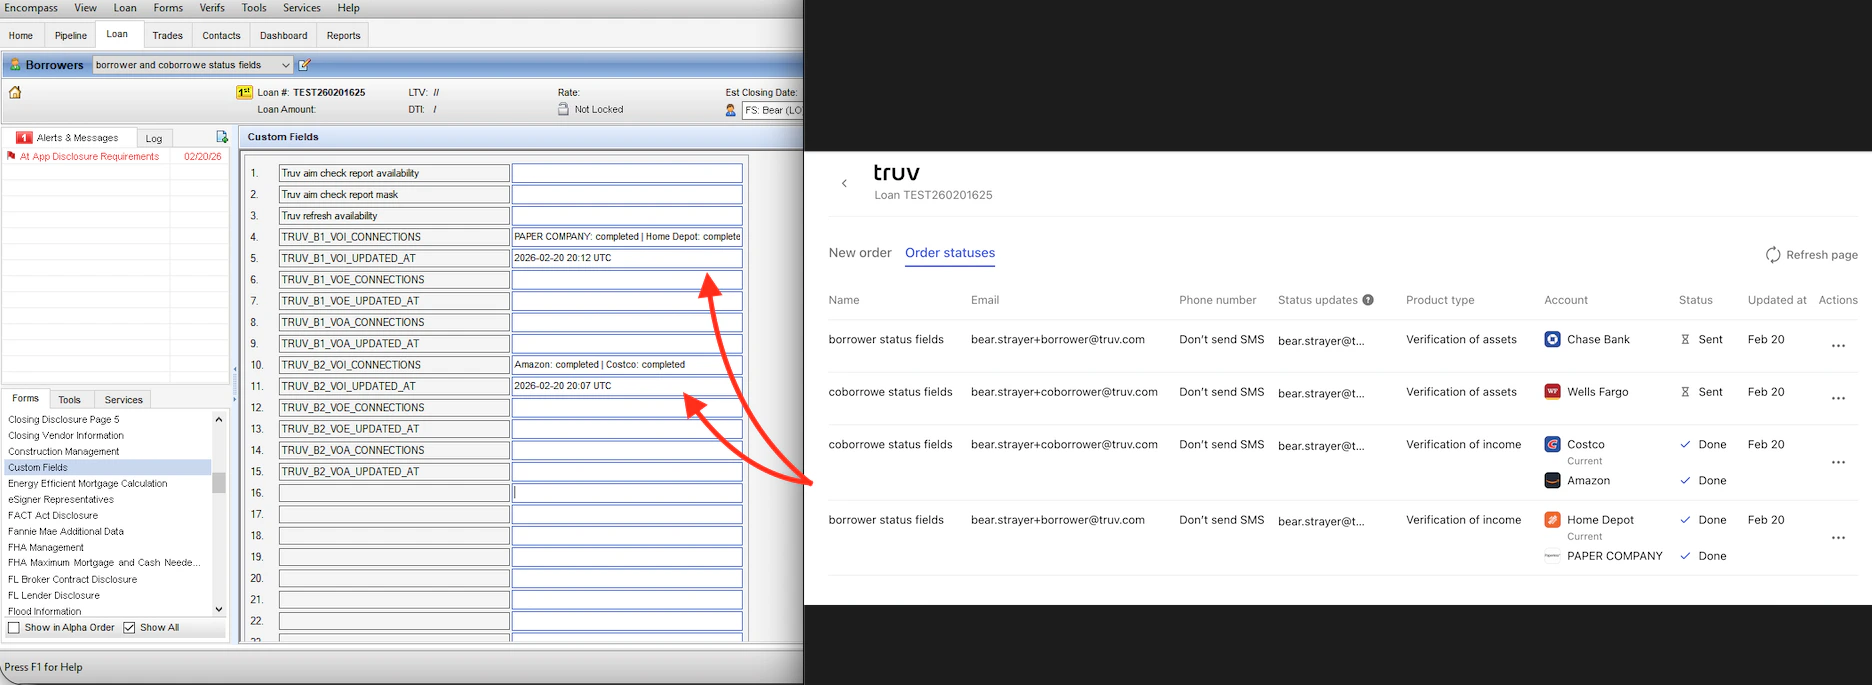
Write order statuses to custom fields
Truv writes order status data for each borrower and product directly into your Encompass loan file, giving your team real-time visibility into verification progress without leaving Encompass.Field Structure
For each borrower and product combination, Truv populates two custom fields:- Connections: a pipe-delimited list of employers or financial institutions and their current statuses, in the format:
[Employer]: [Status] | [Employer2]: [Status] - Last Updated: the timestamp the Connections field was last updated, in the format
YYYY-MM-DD HH:MM UTC
All custom fields must be configured as STRING format in Encompass.
Custom Field Names
| Borrower | Product | Connections Field | Last Updated Field |
|---|---|---|---|
| Borrower 1 | VOI | TRUV_B1_VOI_CONNECTIONS | TRUV_B1_VOI_UPDATED_AT |
| Borrower 1 | VOE | TRUV_B1_VOE_CONNECTIONS | TRUV_B1_VOE_UPDATED_AT |
| Borrower 1 | VOA | TRUV_B1_VOA_CONNECTIONS | TRUV_B1_VOA_UPDATED_AT |
| Coborrower 1 | VOI | TRUV_B2_VOI_CONNECTIONS | TRUV_B2_VOI_UPDATED_AT |
| Coborrower 1 | VOE | TRUV_B2_VOE_CONNECTIONS | TRUV_B2_VOE_UPDATED_AT |
| Coborrower 1 | VOA | TRUV_B2_VOA_CONNECTIONS | TRUV_B2_VOA_UPDATED_AT |
| Borrower 2 | VOI | TRUV_B3_VOI_CONNECTIONS | TRUV_B3_VOI_UPDATED_AT |
| Borrower 2 | VOE | TRUV_B3_VOE_CONNECTIONS | TRUV_B3_VOE_UPDATED_AT |
| Borrower 2 | VOA | TRUV_B3_VOA_CONNECTIONS | TRUV_B3_VOA_UPDATED_AT |
| Coborrower 2 | VOI | TRUV_B4_VOI_CONNECTIONS | TRUV_B4_VOI_UPDATED_AT |
| Coborrower 2 | VOE | TRUV_B4_VOE_CONNECTIONS | TRUV_B4_VOE_UPDATED_AT |
| Coborrower 2 | VOA | TRUV_B4_VOA_CONNECTIONS | TRUV_B4_VOA_UPDATED_AT |
| Borrower 3 | VOI | TRUV_B5_VOI_CONNECTIONS | TRUV_B5_VOI_UPDATED_AT |
| Borrower 3 | VOE | TRUV_B5_VOE_CONNECTIONS | TRUV_B5_VOE_UPDATED_AT |
| Borrower 3 | VOA | TRUV_B5_VOA_CONNECTIONS | TRUV_B5_VOA_UPDATED_AT |
| Coborrower 3 | VOI | TRUV_B6_VOI_CONNECTIONS | TRUV_B6_VOI_UPDATED_AT |
| Coborrower 3 | VOE | TRUV_B6_VOE_CONNECTIONS | TRUV_B6_VOE_UPDATED_AT |
| Coborrower 3 | VOA | TRUV_B6_VOA_CONNECTIONS | TRUV_B6_VOA_UPDATED_AT |
| Borrower 4 | VOI | TRUV_B7_VOI_CONNECTIONS | TRUV_B7_VOI_UPDATED_AT |
| Borrower 4 | VOE | TRUV_B7_VOE_CONNECTIONS | TRUV_B7_VOE_UPDATED_AT |
| Borrower 4 | VOA | TRUV_B7_VOA_CONNECTIONS | TRUV_B7_VOA_UPDATED_AT |
| Coborrower 4 | VOI | TRUV_B8_VOI_CONNECTIONS | TRUV_B8_VOI_UPDATED_AT |
| Coborrower 4 | VOE | TRUV_B8_VOE_CONNECTIONS | TRUV_B8_VOE_UPDATED_AT |
| Coborrower 4 | VOA | TRUV_B8_VOA_CONNECTIONS | TRUV_B8_VOA_UPDATED_AT |
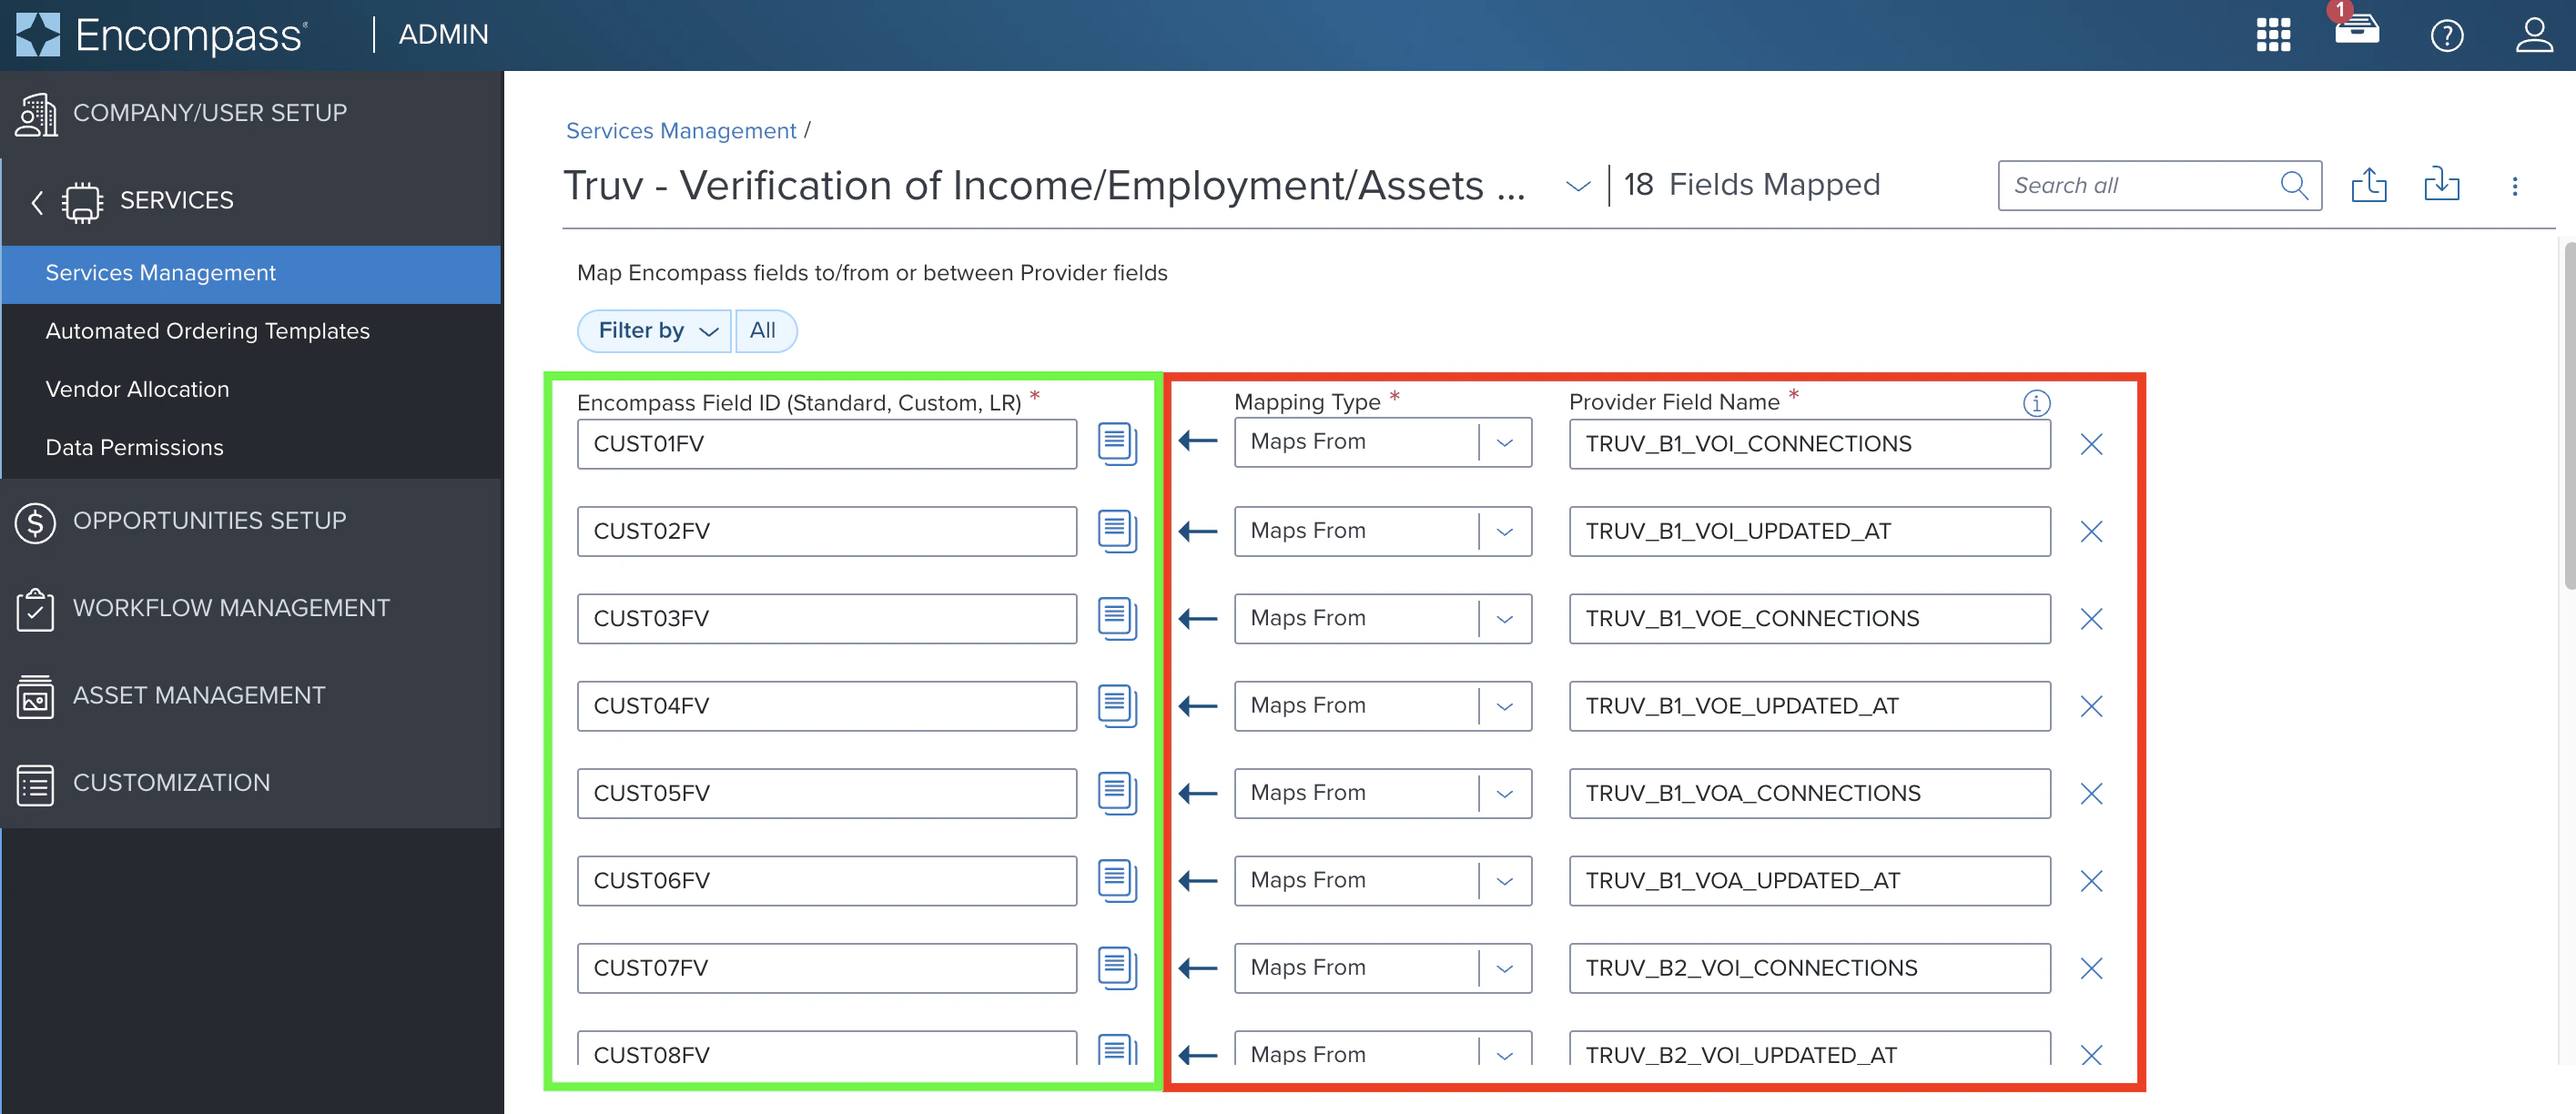
Setup
Open Field Mapping in Encompass
Log into Encompass LO Connect as an administrator. Navigate to Truv - Verification of Income/Employment/Assets and click Field Mapping.
Create custom field mappings
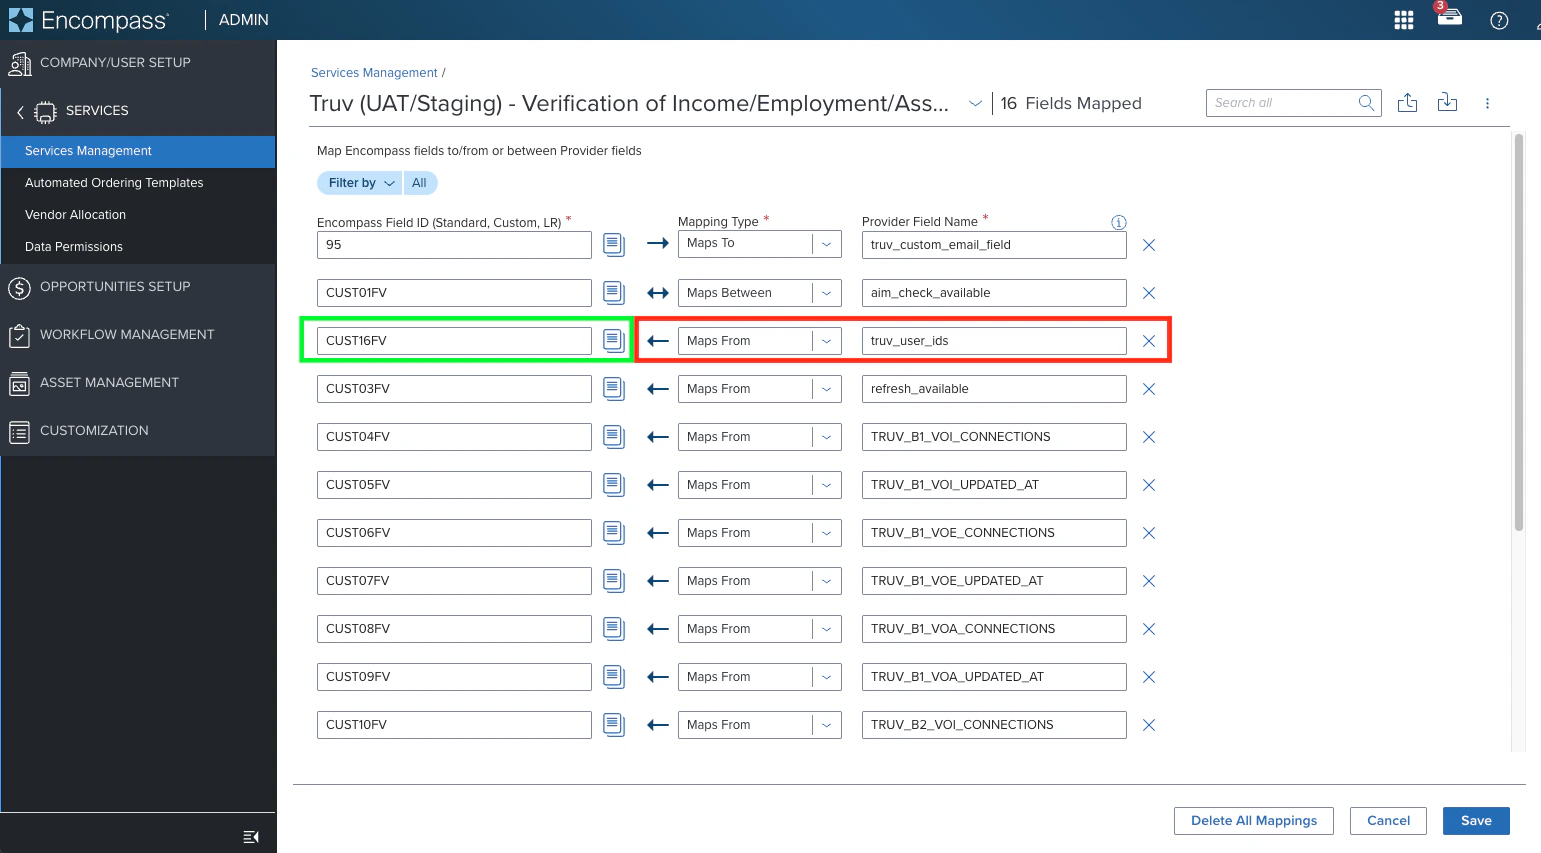
For each Connections and Last Updated field you want to populate, create a new mapping with a Maps From relationship:
- Encompass Field ID (left, shown in green): select an unused Encompass custom field ID
- Mapping Type:
Maps From - Provider Field Name (right, shown in red): enter the Truv field name exactly as shown in the table above (e.g.,
TRUV_B1_VOI_CONNECTIONS)
Write Truv User ID for Each Borrower Into Custom Fields
Lenders can add a single custom field to pull the Truv User ID associated with each borrower into Encompass as a comma-separated list. This can be useful to reference the User ID or utilize Truv public endpoints that require a User ID (such as Retrieve an income and employment report).- As orders are created and User IDs are generated for each borrower, they will be added into this single field separated by a comma.
- The location of each borrower’s User ID in the list is fixed:
[borrower_1], [coborrower_1], [borrower_2], [coborrower_2], [borrower_3], [coborrower_3], [borrower_4], [coborrower_4]. - If a higher-numbered borrower is populated before a lower-numbered one (e.g., borrower_2 before borrower_1), commas for each empty User ID are added to maintain proper placement.
Setup
- Log into Encompass LO Connect as an administrator. Navigate to Truv - Verification of Income/Employment/Assets and click Field Mapping.
- Create a new custom field mapping with a Maps From relationship and
truv_user_idsas the Provider Field Name. Select an unused custom field in the Encompass Field ID column and press Save.
Next steps
Placing Orders
Manual ordering, ASO configuration, and AIM Check
Admin Setup
One-time Encompass configuration
Truv Templates
Manage templates in the Dashboard